3. Assessment 1: Apollo & Galaxy Familiarisation Exercise
3.1. Your First Gene
Now that you’ve completed the Apollo and Introduction to Galaxy tutorials, you’re (almost) ready to annotate your first gene! For now you will be picking a random gene to annotate. During the course, we’ll cover in detail how and why you would choose one specific piece of evidence for a gene over another.
With the actions that you are preparing to do, you are declaring:
Out of these options generated by the computer, I believe this one to be an accurate guess as to the presence of a gene and protein product from this region of the DNA.
We will attempt to back up these statements (e.g. “this is the precise boundary of a gene”) with evidence, however, these are all educated guesses until validated in the lab.
3.2. Getting Started
Run this tool
It will output an HTML file “Access Assessment 1 Organism”
Click on the eyeball icon to view the dataset
This will open a view of Apollo in the main panel (let us know if it does not)
Hide the Apollo panel
- You’re ready to follow along with the rest.
3.3. Structural Annotation
Often times we’ll be interested in the start codon of a gene, so let’s briefly zoom in for a closer look:
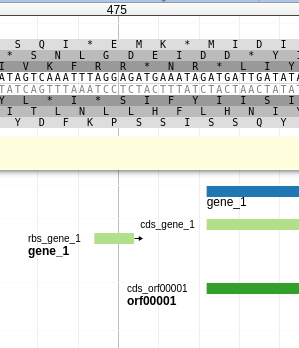
Fig. 3.1 At the top is the 6 frame translation of the sequence (i.e. the amino acid translation for each set of 3 nucleotides). Between the two translations is the DNA sequence of the genome, in both forward and reverse (or sense/anti-sense, plus/minus, watson/crick). Below the translation is a pale yellow bar where User-created annotations go. Lastly is the evidence track area, showing features coloured in dark blue, light blue, and light green.
Each track contains the output of a gene calling programme which has predicted the presence of a gene. These are our pieces of evidence that we will use later on.
For this exercise:
Find any predicted gene (anywhere in the genome) on one of the gene call evidence tracks (Glimmer or MetaGeneAnnotator are good choices–we’re currently having a rendering bug with GeneMarkS)
Right click the feature on the annotation track and select Create New Annotation -> Gene
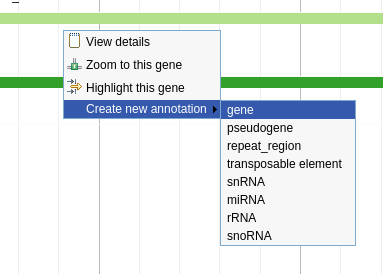
Fig. 3.2 Creating a gene
Congratulations! Your first structural annotation. After the previous step, a feature should have shown up on the User Created Annotations track in the pale yellow bar.
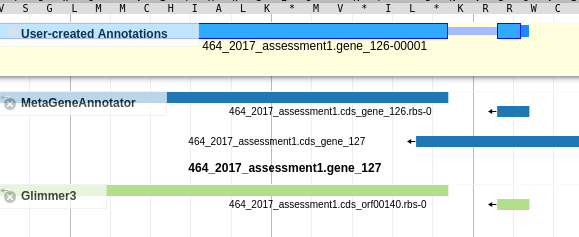
Fig. 3.3 Created Gene
Once you’ve created an annotation, you can left-click on the annotation to view the gene sequence. This is useful when looking for sequence motifs or just casually checking the RBS sequence.
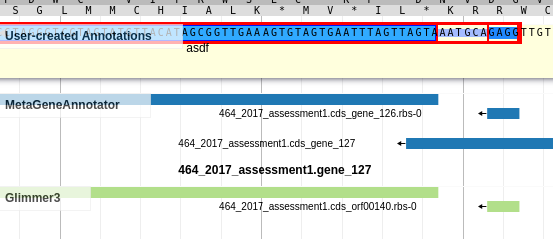
Fig. 3.4 Gene Sequence
Right clicking the annotated gene will bring up a large menu we’ll cover later. The most important action on that menu is “Edit Information,” which allows you to add feature attributes, like those mentioned in the gff3 section.
3.4. Functional Annotation
Now that you’ve made a “structural” annotation (the existence and position of a feature in a genome), you’ll try making a “functional” annotation (what the gene does). We’ll come back to this process in more detail later, but for now you need to do the following:
Right click the gene you annotated on the “User-created Annotations” track
Select “Edit Information.”
- A panel will open containing metadata about the annotation.
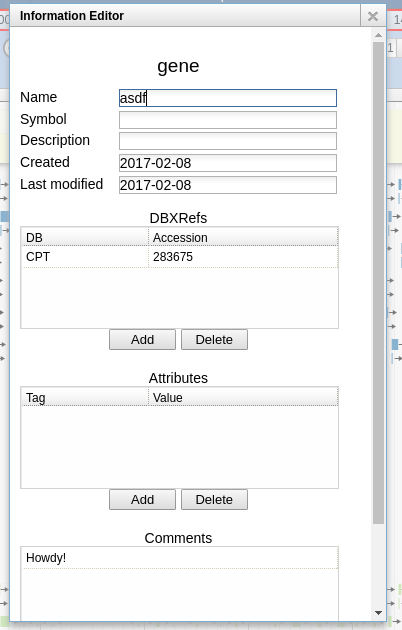
There are multiple fields for data in this dialog:
- Name: This is where you will enter the annotation for this gene, which is usually a human-readable description of its function or role (e.g., “major capsid protein”, “holin”, etc.).
- Symbol: This would usually be for the short gene mnemonic name (e.g., “motA” or “int”). Such names are usually assigned to genes based on experimental evidence; since nobody’s ever done any experiments with our novel phages, leave this field blank.
- Description: A catch-all field, leave this onel blank as well.
- Created, Last modified: These are generated by the system, leave these alone.
- DBXrefs: These are “Database cross-references.” These link to other databases, like sequence databases. We’ll talk about databases later, for now, leave this alone.
- Attributes: These are simply key-value pairs. In theory, these can be used freely, but certain keys have special meanings to other programs that might read the genome file. For now, leave these alone too.
- Comments: This is a free-text field where you may enter any comments you have during the annotation process. We want you justify each annotation you make in your own genomes by adding a short note to this field. We will remove most these notes before your genome is published, so you can add whatever notes you like here.
Now that you’re familiar with the interface, you should take the protein you’ve created on the User-created annotation track and add some annotations. Please add the annotations listed below so we can track your progress:
- Name: Enter your name here.
- Comments: Enter a few words of free text here.
Done! You’ve annotated your first protein. We will review everyone’s progress in this exercise.
